Monday, April 30, 2018
1 Brilliant Way to Make Laundry Day 3 Times Better
Wood Rot, Roof Overhangs and Concrete Anchors
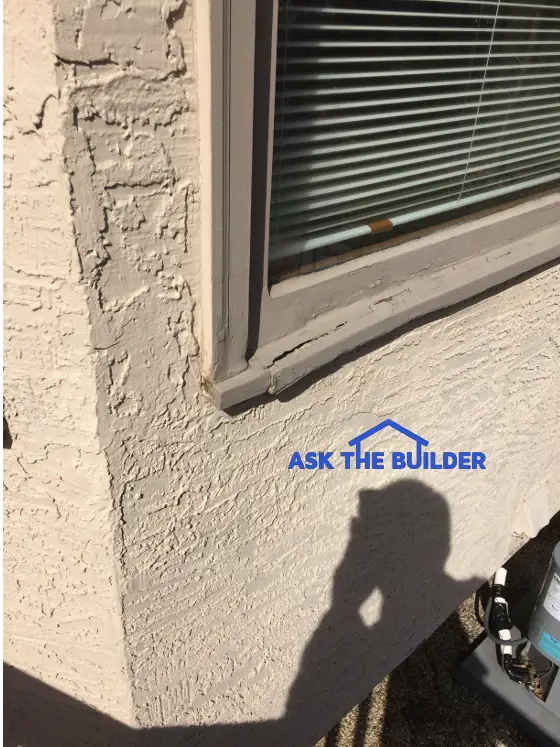
There are two reasons why this wood window sill is rotting. First and foremost, there’s no roof overhang. The second reason is low-quality hybridized lumber was used to build the window sill. (C) Copyright 2018 Tim Carter
Question #1: Tim, the window frame on the back of my house is deteriorating. If you look at the three photos I sent, you’ll see there’s no gutter over this window, but rain diverters up in the shingles. What’s the best way to repair the damage and prevent it in the future? Andy, Westerville, OH
I’ve seen an alarming rise in wood-rot questions like Andy’s. Perhaps it’s happening with your wood windows, exterior house trim, and wood door frames. It’s happening at my own home here in New Hampshire. It’s important to realize I didn’t build the house I live in and would have never used the brand of wood trim that’s all over my house.
Another key point is the lack of roof overhangs on the projecting bay where the problem windows are located at Andy’s house. Roof overhangs are yet another building best practice that are fast becoming myth. All Andy has to do is drive through neighborhoods near him where the houses were built in the early 1900s to see generous roof overhangs.
A roof overhang is not much different than an umbrella. You stay dry using a large umbrella as you walk in the rain because the drip line of the umbrella is a good distance away from your body. Roof overhangs do the same to keep house walls, windows and doors dry except during violent wind-driven rainstorms.
The wood trim on your home may be just like Andy’s. Over the past few decades, there’s been an alarming trend to use hybridized lumber that grows rapidly in the spring. This lighter-colored growth band between the darker summer wood band allows water to soak deep into the wood trim. Fungi spores go along for the ride and the next thing you know your wood is rotting.
You can use two amazing products to repair the wood rot and even rebuild missing wood. The first product is a milky liquid wood hardener that you brush onto the rotted wood. It works best if you apply this to dry wood. After one day you then mix up a heavy-bodied wood epoxy to fill any gaps, holes or large cracks. The epoxy can be sanded, painted and stained.
You can watch a short video how to use the milky liquid and wood epoxy. The video should give you the confidence that you can do this simple repair. I’ve used the products at my own home with great success and feel confident you’ll discover they’re easy to use. Go to: http://go.askthebuilder.com/woodrot
Question #2: Tim, I really need your help. I’ve got to attach a piece of 2x4 treated lumber to a concrete block wall. A sidewalk gate will be attached to this piece of wood so it needs to be rock solid. I know the concrete block wall is filled solid with concrete because I watched it being built. How can I install an anchor bolt now in this wall so it never comes out? Teri, Bloomington, IN
You may be in a similar situation as Teri wanting to install a threaded bolt into a concrete slab or perhaps a concrete block wall. Believe me, there are countless anchor designs and products all that may work well.
The good news is you can get a simple hex-headed bolt and three nuts at your local hardware store that will do for you what Teri needs to do at her home. You’ll also need to rent a hammer drill to create a very special hole. The only other thing you’ll need is some easy-to-use concrete epoxy that holds the bolt in place and prevents it from ever being pulled from the concrete or concrete block.
You can borrow a tip from your dentist for this project. The reason the fillings in your teeth don’t come out is because your dentist creates a hole in your tooth that’s wider at the bottom than at the top. You’re going to do the same thing with the hammer drill by drilling into the concrete at different angles as you drill the hole.
I’d want the bolt to be embedded in the concrete at least 1.5 inches. Teri is using a 2x4 which is 1.5 inches thick. She should have about 1 inch sticking past the face of the 2x4 to attach a washer and nut. This means she’ll need a 4-inch-long hex-head bolt. To ensure the bolt doesn’t turn when she’s attaching the wood, she needs to thread on two nuts to within 1/4 inch of the head. Use wrenches to tighten the two nuts against one another.
After the holes are drilled all the dust must be removed from the hole. Don’t blow into it with your mouth! You’ll get a blast of dust in your eyes and be off the the ER. When you’re at the hardware store, get a 2-foot length of 3/8-inch plastic tubing. Insert one end into the hole, bend the tubing to get around the corner and then blow on the other end of the tubing.
Squirt some epoxy onto the end of the bolt that goes into the hole and then add more in the hole so it oozes out when you insert the bolt. Allow the epoxy to cure for 48 hours before attaching anything to the anchor bolt.
If you want to watch a short video showing how to drill the bell-shaped hole into concrete block for a permanent anchor, go to: http://go.askthebuilder.com/anchorinconcrete
Column 1246
The post Wood Rot, Roof Overhangs and Concrete Anchors appeared first on Ask the Builder.
Via builders feed http://www.rssmix.com/How To Install an Anchor in Concrete Block
How To Install an Anchor in Concrete Block With Epoxy
It's easy to install a permanent anchor into concrete block or solid concrete.
The trick is to talk to your dentist first. Watch the video above and it should make all the sense in the world.
The post How To Install an Anchor in Concrete Block appeared first on Ask the Builder.
Via builders feed http://www.rssmix.com/April 29, 2018 AsktheBuilder Newsletter
Are you a teacher or do you work in a school? I had the pleasure of helping teach a middle-school STEAM class in Missouri about ten days ago.

Ms. Chantell Mason reached out to me to ask if I'd do a video conference with two of her classes. They had an assignment that put them in charge of building a new school.
They had questions about building on rocky soil and Ms. Mason had discovered my past column about the topic.
The photo above was taken during the class and I'm up on that white screen believe it or not.
Each of the kids that had a question would come up to the camera and speak into the microphone. The other kids would tap away at their laptops with my answer.
In one of my answers, I gave an example of where NOT TO BUILD a school and referenced a silly school in Cincinnati, OH that was built in the floodplain of the Ohio River. The entire building is up in the air on giant concrete piers much like a huge table.
Within 60 seconds one of the kids came up to the camera, held up their laptop screen so I could see it and said, "Mr. Carter, is this the school building?"

It's important to realize I didn't ask the kids to go look it up.
This young woman had indeed located the CORRECT school with minimal clues. I didn't say the name of the school. I didn't mention WHERE in Cincinnati it was other than along the Ohio River.
There's HOPE!
If you're a teacher and need me to help you one day in your classroom, you know what to do. Just Ask Tim.
On-Demand Radio Benefit For You
Friday, my great buddy Chuck Eglinton uploaded my ninth on-demand radio show. It's free to listen to.
One of the great things about getting back in front of the microphone is I'm rediscovering past columns I forgot about!
I'll be talking to a homeowner about a problem, for example Steve last week, and BOOM!
"Hey Steve, I've got a column that explains how to fix that."
Steve had reached out to me with a common problem - his ancient toilet wasn't flushing correctly.
He told me he had been dealing with this issue for well over TEN YEARS!
The best part is he shot a short video and sent it to me. CLICK HERE and scroll down the page to see the video:

Not only did I fix Steve's toilet making it flush like NEW, but my recommended fix got rid of some horrible staining he had tried to remove for years.
Steve was SO HAPPY he taped a follow-up video showing how his toilet was flushing correctly AND it looked like new! The follow-up video is part of the above video. Go watch it.
WOOT! I love love love getting feedback like that as it reinforces that what I do is really helping you.
Here's the old column that I had Steve read to see how to fix his toilet.
Andy's Rotten Wood Window Sill
I then talked with Andy about a common problem you might have.
Wood rot
In Andy's case it was caused by an idiot builder or architect who didn't provide enough roof overhang on Andy's house.
CLICK HERE to see three photos of Andy's lack of overhang and his wood-rot problem.
CLICK HERE to see how to repair the wood rot. Watch the video I taped last November in Los Angeles.
Fun Construction Quiz
Friday, I was driving back from a journey and I saw a house being built just a few miles south of my home.
Surprisingly, there were just a few workers there and I decided to walk around and get some photos. If the homeowners are expecting to enjoy the summer along the lake here, they better light a huge fire under the builder.
CLICK HERE to see one of my photos and take the FAST two-question quiz.
It's FUN and I GUARANTEE you'll discover something new.
Be sure you SCROLL UP after clicking SUBMIT so you can see your score. If you selected the wrong answer, I tell you the right answer and why it's correct.
That's enough for a Sunday. More next week.
Tim Carter
Founder - www.AsktheBuilder.com
Captain Magic Outdoor-Radio Man - www.W3ATB.com
Purveyor of Uncle Tim's Magic Crystals - www.StainSolver.com
Do It Right, Not Over!
The post April 29, 2018 AsktheBuilder Newsletter appeared first on Ask the Builder.
Via builders feed http://www.rssmix.com/Construction Defect Quiz One of Many
Be sure to scroll UP after clicking SUBMIT so you can see your score and the CORRECT ANSWERS.
The post Construction Defect Quiz One of Many appeared first on Ask the Builder.
Via builders feed http://www.rssmix.com/How To Draw Riser Diagram

This is a very simple riser diagram. It's in isometric 3D format so you can see what pipes have slope, what pipes are vertical in walls, and what pipes run horizontal in walls. Copyright 2018 Tim Carter
" ...you need to have a deep understanding of plumbing waste and vent systems to be able to draw one correctly."
How To Draw Riser Diagram - Not Too Easy, Sorry!
You want to know how to draw a riser diagram. I get it. You need to pull your permit and you're stuck.
You've seen the diagrams and feel you can draw the lines and magic happens.
The trouble is you need to have a deep understanding of plumbing waste and vent systems to be able to draw one correctly.
If you take a piece-of-crap drawing into the building and plumbing department, they'll probably show you the door.
Even if you don't have to use the drawing to get a permit, you still might draw a few of the pipe connections wrong. If you put the wrong pipe fittings in, your system could experience chronic clogging.
In other words, drawing a riser diagram is not something I can teach you in a 300-word column. However, you may be able to watch the following video and start to gain some confidence.
Related Links
Plumbing Vent Pipe Covers - Are They Needed?
Basics Needed To Draw A Riser Diagram
Here's what you need to draw a correct riser diagram:
- 30/60/90 triangle
- fixture unit table
- pipe size table
- knowledge of dry and wet vents
- knowledge of illegal fittings under slabs
- knowledge of best plumbing practices (CLICK HERE to download)
The plastic triangle allows you to draw the proper lines in a 3D format so it's easy for someone to visualize the true relationship of the pipes once they're installed. Here's a typical photo of pipes going in and you need to be able to represent this on paper with just lines:

These are real pipes under a slab. You need to be able to draw this up on paper so someone can create the same thing looking at your drawing. Do you have those skills? If not CLICK THE PHOTO and hire me now. Copyright 2018 Tim Carter
Solid and Dashed Lines in Riser Diagrams
You'll notice both solid and dashed lines in the riser diagrams on this page. The solid lines carry liquid and solid waste and the dashed lines are designed to only contain air.
However, the dashed vent lines do carry liquid in the form of condensate so they need to be installed so they drain by gravity.
The trouble for a rookie like you is that some solid lines in riser diagrams can also be approved vent lines too.
See how you need to be a master plumber to understand what's going on? The diagram below has a short section of this hybrid waste/vent line. See if you can identify it.

I'm a master plumber and I drew this in about ten minutes. It shows the fixtures in a bathroom that's being added to an existing home. The solid lines carry water and waste. The dashed lines only carry air and some condensation water. (C) Copyright 2018 Tim Carter - Master Plumber
I'm A Master Plumber Who Draws For People
I've drawn many many riser diagrams. I'll never forget the day I sat for my master plumber's exam.
We had to draw a riser diagram for a multi-story building that had all sorts of crazy fixtures in it. I loved making these diagrams.
Two weeks after the exam the head of the plumbing department called me to tell me I was the only person to ever get the entire drawing correct. I found that very hard to believe because I knew many many intelligent plumbers in my city that sat for the same exam.
It's important to realize I now draw them for homeowners like you all over the USA. Click here to hire me.
Free & Fast Bids
CLICK HERE to get FREE & FAST BIDS from local plumbers if you get your butt in a sling.
The post How To Draw Riser Diagram appeared first on Ask the Builder.
Via builders feed http://www.rssmix.com/Meet the Blogger Series: Farmhouse on Boone
For the next couple of months, we will be introducing you to some of our blog friends. This month we want you to meet Lisa from Farmhouse on Boone!
Hi Everyone! My name is Lisa from Farmhouse on Boone. I’m so excited Cassity is having me over to tell you all a little bit about my blog and myself. I also hope to inspire you to get creative in your own home, by sharing some of my favorite projects from the farmhouse!

I am a homeschooling mama of five, two girls and three boys. We live in a small farmhouse in the Midwest that we have renovated from top to bottom. When we bought it in 2008, it took a little imagination to see the potential. Here is a snippet of what we saw when we first walked through:
 With countless gallons of paint, lots of elbow grease and a little design we gave it a farmhouse style kitchen, renovated front porch, claw foot tub and plenty of character. We worked on an all cash basis and were able to pay off our farmhouse in less than five years. You can check out our debt free story here: How we Paid Off Our House in Less Than 5 Years.
Farmhouse Front Porch Renovation

With our farmhouse front porch renovation we shared How to Cover Concrete Steps with Wood, How to Strip Paint from an Antique Farmhouse Front Door and How to Update a Cracked Sidewalk with a Pebble Path.


Simple Spring Farmhouse Bedroom

I have been blogging for just over two years about our renovation journey and our simple lifestyle. I love sharing everything from how to make fermented foods to sewing a linen apron, basket liner and a slipcover for a wingback chair.
I also do a little organization like this Farmhouse Laundry Room Cabinet OrganizationMakeover, Spice Cabinet Organization and Pantry Organization with Mason Jars.
I share two new videos every week on my Youtube channel on food from scratch, natural living and a handmade home. Please consider subscribing!
Follow Farmhouse on Boone on Instagram for more inspiration from the farmhouse.

Spice Cabinet Organization // How to Sew a Slipcover for a Wingback Chair // Farmhouse Bathroom Renovation
DIY Grain Sack and Ticking Stripe Pillows // Farmhouse Front Porch Renovation
How to Sew a Basket Liner // DIY Linen and Ruffle Throw // Farmhouse Pantry Organization
Thank you so much for hosting me, Cassity! I hope to see you over on my blog Farmhouse on Boone.
The post Meet the Blogger Series: Farmhouse on Boone appeared first on Remodelaholic.


Sunday, April 29, 2018
Construction Defect Quiz One of Many
Be sure to scroll UP after clicking SUBMIT so you can see your score and the CORRECT ANSWERS.
The post Construction Defect Quiz One of Many appeared first on Ask the Builder.
Via builders feed http://www.rssmix.com/Saturday, April 28, 2018
10 Weird But Useful Gadgets You Might Not Have Yet
Edge Your Beds: 11 Easy Ideas for Landscape Borders
Easy Gallery Wall Ideas + Tips for Hanging a Gallery Wall Quickly
Do you have a gallery wall of frames and art in your home? Or do you have a stack of frames that you *intend* to hang as a gallery wall… when you can get up the courage to actually hang them all? Today’s tip for hanging a gallery is going to change your gallery-wall-loving life!
Watch the video below to see how Krista hung a huge gallery wall in her entryway — 47 frames! — in under 2 hours. What? Yes! Nothing like saving time and getting it right the first time!
Subscribe to our Remodelaholic YouTube channel here for new videos every week!
If you prefer to read it, you can read the written break-down of this super smart frame hanging tip here.
Whether you’re hanging frames, canvases, wall decor, mirrors, or mixing it all up, this hack for hanging frames quickly will make it so much easier! Even for a simple modern grid gallery wall, using this tip will save you a lot of time measuring and making extra nail holes in the wall to get the gallery wall hanging straight and perfectly spaced. Use this speedy frame-hanging trick for a holiday gallery wall or any old gallery wall! (and don’t forget to check out our favorite free printables to add to gallery walls!)
Need more inspiration? Here are some beautiful DIY gallery walls to get you going:
Coastal Painted Canvas Gallery Wall | Craftberry Bush
Anniversary Photo Gallery Wall | Lolly Jane
Vintage Mirror Gallery Wall | Blesser House
Farmhouse Stair Gallery Wall | Little Vintage Nest
Living Room Gallery Wall | Love Grows Wild

TV Gallery Wall | Place of My Taste

Gallery Wall Above The Piano | Reality Daydream

Stairway Gallery Wall | On Sutton Place

Family Photo Canvas Gallery Wall | Living Well Spending Less

Large Photo Gallery Wall Grid | Sincerely Sara D

Vintage Gallery Wall | Lillian Hope Designs

Corner Gallery Wall | Cherished Bliss

Dining Room Gallery Wall | Little Vintage Nest

The post Easy Gallery Wall Ideas + Tips for Hanging a Gallery Wall Quickly appeared first on Remodelaholic.


