Continuing in our Creative Christmas series: Krista envisioned and built these adorable rustic 3D wood trees from reclaimed wood, built with angled tiers of wood slats stacked pyramid-style on top of each other. Perfect for Christmas and the whole winter. The cutting and assembly method is so brilliant, and Krista walks you through it all in the post so you can build your own little grove of wood evergreen trees!


Aren’t these trees great? My mom replaced her fence that was older than I, and gave me all of the wonderful weathered slats!

The idea for these trees came to me while driving my kids to school. I wanted to make something you could view 360 degrees, and I wanted to try cutting the boards like crown molding.
I couldn’t wait to see how they turned out. So I hurried home, and got to work! I love how they turned out!
How to Build Stacked & Tiered 3D Wood Trees
Click here to get free printable building instructions
Supplies
- 3 weathered 3 1/2″fence slats*
- 1 weathered 2″x 2″ x 6’*
- 1 weathered 2″x 4″x 6’*
- Glue
- 1 1/4″ 18 gauge finish nails
- 2″ 16 gauge finish nails
- Paint
- Scrap 1″x 2″x 2′
*Or you can use fresh wood and distress it with stain and tools for a weathered look, like this.
Tools
- Miter Saw
- 18 gauge nail gun
- 16 gauge nail gun
- Air compressor

Step 1
Set up your saw
Adjust your saw to 45 degrees. Clamp your scrap piece of 1″ x 2″ onto the bottom of your miter saw 2 1/4″ from your fence.

The bottom of your board will sit against this fence. This will allow you to make a compound miter cut without having to adjust your blade for two angles.

Step 2
The first cuts you will make are for the top layer of the tree. Make one 45 degree mitered cut, flip the board and line the blade up with the previous cut so that you have a sharp point as shown below.

The next cut requires you slide the board down 1/2″ and cut the remaining mitered edge.

Repeat these steps 3 more times so that you have 4 pieces.
Step 3
For the second layer cut 1/2″ off of the mitered edge remaining from Step 2 if you haven’t already. Then mark 2 1/2″ on the top of the board.

Adjust the board until the mark lines up with the blade, and then clamp a scrap piece of lumber to your bottom fence to set a jig for the length of the second layer.

Make your next cut.

Then flip your board, slide it over until it touches the jig, and cut your next piece. Repeat two more times so that you have 4 pieces.
Step 4
For the remaining layers you will measure and set the jig as shown above using the following measurements.
Cut 4 of each @
3rd layer = 4 1/2″
4th layer = 6 1/2″
5th layer = 8 1/2″
You could keep going depending on how big you want your tree to be. I made three trees. One that is three layers. One that is four layers, and the last one is five layers.
Step 5
Glue the top layer.

Lay all four pieces out, and run a bead of glue on one edge of each piece.

Then press the pieces together and let dry.

Repeat for each layer.

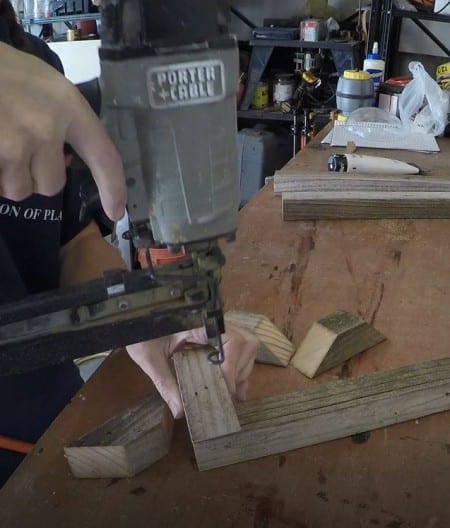
Step 6
Assemble the tree! Place the bottom layer on your work surface, and then place the next layer on top of that section.

Using your 18 gauge nail gun with 1 1/4″ nails, nail the layers together while holding the nail gun at an angle to ensure you go through both pieces.
Place the next layer, and secure with nails.

Place the top layer, and secure with nails.

Repeat for each tree.

Step 7
Cut your weathered 2″x 2″ to the following lengths for the stand uprights:
12″
18″
24″

Step 8
Cut the base for tree stand.

Cut one 45 degree angle at the end of your 2×2, rotate your lumber 180 degrees. Measure the width of your stand upright. Transfer that measurement to your cut piece, measuring from inside of the angle. Slide the board over until the blade lines up with your mark, and clamp a board against the fence to set a jig for these cuts. Make the second cut. Rotate the board 180 degrees again, and cut. Repeat 2 more times, until you have 4 pieces.
Step 9
Assemble the tree stand.
Place one base piece on the upright. Using the 16 gauge and 2″ nails, secure to upright.

Place a nail through the corner into the next piece. Repeat for each piece.

Step 10
Paint!

Using a dry brush, paint your trees! I painted the small tree with white acrylic paint.

I painted the medium tree with a metallic green paint.

For the large tree I alternated each layer with a silver metallic paint, and gold metallic paint.
Step 11
Place tree on top of the assembled stand. The 2×2 should fit inside the top layer. Nail down through the top layer into the stand using the 2″ 16 gauge nails to secure the tree to the base.

Repeat for each tree.

Step 12
Find a happy new home for your awesome trees!

These would look great as a centerpiece.

With some straw and lights,

or on your front porch next to these Rustic Herringbone Wood Trees… that tutorial will be up later this week, so be sure to subscribe by email or RSS and follow along over on Facebook, Instagram , and YouTubewith #CreativeChristmas so you won’t miss any of our new Christmas tutorials, recipes, and printables!
Tips and trick for beautiful homemade gingerbread houses
Dollar Store Christmas Tree Decorating: Wintry Silver and White 
The post How to Build 3D Wood Trees for Christmas and Winter Decor appeared first on Remodelaholic.


No comments:
Post a Comment